With live streaming becoming increasingly prevalent in 2015, developers are focused on creating applications to address the public’s fascination with streaming media. Periscope is the prime example of such an application and the sheer size of Periscope’s user base and class-leading engagement metrics validate its dominance in the space. But what does it take to… Continue reading Build Periscope in 10 Minutes
With live streaming becoming increasingly prevalent in 2015, developers are focused on creating applications to address the public’s fascination with streaming media. Periscope is the prime example of such an application and the sheer size of Periscope’s user base and class-leading engagement metrics validate its dominance in the space.
But what does it take to build a live streaming and communication platform such as Periscope, with the capability to broadcast to one hundred thousand or even one million subscribers? What if I told you that you could build a live streaming application with Periscope-like functionality and scalability in just 10 minutes?
Before we created Red5 Pro it took some serious effort to build this kind of server-side infrastructure and tackle the high level of complexity to build a native Android and iOS video encoder/decoder that works with the server. We saw this trend of a new kind of mobile app that connects people in real-time, and we saw these early adopters cobble together inefficient software wasting tons of time and energy. We couldn’t allow this to happen anymore, so we decided to make it easy for developers. With Red5 Pro, you truly have the ability to build the guts of the next live streaming phenomenon in a matter of minutes, and here’s how:
Let’s first start with all the pieces, and what you would need to build if you were to do this from scratch.
The Fundamentals
- Publish from the mobile client:
- Access the camera
- Encode the video
- Encode microphone data
- Negotiate a connection with a media server
- Implement a low-latency streaming protocol for transport
- Stream the data to the server
- Intercept with a media server
- Intercept the stream
- Relay to other clients
and/or
- Re-stream to a CDN (adds latency)
- Record the stream (optional
- Implement client side subscribing:
-
HLS in WebView (even more latency)
*and/or* -
Setup connection with media server
-
Implement streaming protocol
-
Mix the audio and video
-
Decode video/audio
-
Render video and play the audio
*Note: this is actually a simplified list of all the tasks involved. Try doing this on multiple threads and getting it to perform well; it is complicated! It’s truly a rabbit hole that most developers don’t want to venture down. Given the awesome tools and libraries that exist for us developers, we thought that it was ridiculous that an easy-to-use and extensible live streaming platform just didn’t exist. That’s why we built Red5 Pro.
Red5 Pro to the Rescue
Let’s uncomplicate this. The Red5 Pro Streaming SDKs provide what we think is an intuitive and flexible API to remove the complexity while retaining tremendous control if you need it. Let’s take a look at the classes our SDKs provide. (note that they are the same on Android and iOS).
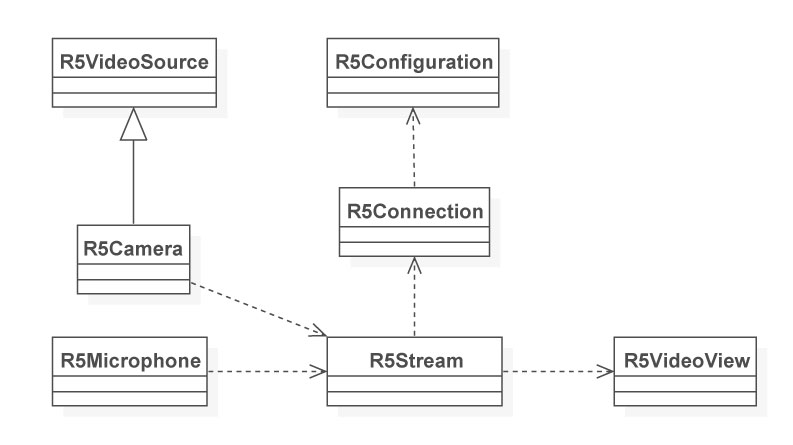
Let’s step through an example using these classes, piece by piece.
The Publisher
R5Configuration:

The first step is to create an R5Configuration. This class holds the various data used by your streaming app. It contains things like the address of your server, the ports used, protocols, etc. In this example we are connecting to a server running at 192.168.0.1 on port 8554 via the RTSP protocol. This Red5 Pro server has an app called “live” running on it, and that is what we want to connect to based on the context name. And finally we are setting the buffer time to half a second.
iOS
//Setup a configuration object for our connectionR5Configuration *config = [[R5Configuration alloc] init];config.host = [@"192.168.0.1"];config.contextName = [@"live"];config.port = 8554; config.protocol = 1;config.buffer_time = 0.5;Android
R5Configuration config = new R5Configuration("rtsp", "192.168.0.1", 8554, "live", 0.5f);R5Connection:

Next, you create an R5Connection object, passing in your configuration. This establishes a connection to the Red5 Pro media server.
iOS
R5Connection *connection = [[R5Connection alloc] initWithConfig: config];Android
R5Connection connection = new R5Connection(config);R5Stream:

Now you create a stream object passing in the connection object you just created. Note that the R5Stream is also used for incoming streams, which we will get to in a bit.
iOS
//Create our new stream that will utilize that connectionself.publishStream = [[R5Stream alloc] initWithConnection:connection];//Setup our listener to handle events from this streamself.publishStream.delegate = self;Android
//setup a new stream using the connection publishStream = new R5Stream(connection);R5Camera:

Next we create a camera object and attach it to the R5Stream as a video source.
iOS
//Get a list of available cameras for this deviceNSArray *devices = [AVCaptureDevice devicesWithMediaType:AVMediaTypeVideo];//Use the last device (front facing)AVCaptureDevice *videoDev = [devices lastObject]; //Create an R5Camera with that device//and specify the max bitrate to allow //Note : This bitrate will not be respected //if it is lower than the encoder can go!R5Camera *camera = [[R5Camera alloc] initWithDevice:videoDev andBitRate:512]; //Set up the resolution we want this camera to use.//This can only be set before publishing beginscamera.width = 640;camera.height = 480; //Setup the rotation of the video stream. This is meta data, //and is used by the client to rotate the video. //No rotation is done on the publisher.camera.orientation = 90; //Add the camera to the stream[self.publishStream attachVideo:camera];Android
//attach a camera video sourcecam = openFrontFacingCameraGingerbread();cam.setDisplayOrientation(90);R5Camera camera = new R5Camera(cam, 320, 240);camera.setBitrate(res.getInteger(R.integer.bitrate));camera.setOrientation(-90);publishStream.attachCamera(camera);R5Microphone:

Then we create a microphone object and attach it to the stream as an audio source.
iOS
//Setup a new R5Microphone for streaming audio with that deviceR5Microphone *microphone = [[R5Microphone new] initWithDevice:audioDevice];microphone.bitrate = 32;//Attach the microphone to the stream[self.publishStream attachAudio:microphone];Android
//attach a microphoneR5Microphone mic = new R5Microphone();publishStream.attachMic(mic);R5VideoView:

While it’s not a requirement to publish a live stream, we find it useful to provide a preview for the user of their video being streamed from the camera. This is how you set that up.
iOS
-(R5VideoViewController *) getNewViewController: (CGRect) frame{ UIView *view = [[UIView alloc] initWithFrame: frame]; R5VideoViewController *viewController = [[R5VideoViewController alloc] init]; viewController.view = view; return viewController;}[self addChildViewController:self.r5View];[self.view addSubview:self.r5View.view];//show the camera before we start![self.r5View showPreview:YES];//show the debug information for the stream[self.r5View showDebugInfo:YES];//attach the R5VideoViewController to our publishing stream[self.r5View attachStream:self.publish];Android
R5VideoView r5VideoView =(R5VideoView) view.findViewById(R.id.video);r5VideoView.attachStream(publishStream);publishStream.setView(r5VideoView);cam.startPreview();R5Stream.publish():

Finally the last step for the publisher is to publish the stream using a unique name that the subscriber can subscribe to.
iOS
//start publishing![self.publishStream publish:[@"myUniqueStreamName"] type:R5RecordTypeLive];Android
publishStream.publish("myUniqueStreamName", R5Stream.RecordType.Live);The record type parameter tells the server the recording mode to use on the server. In this example we are setting it to **live, **meaning it won’t record the stream on the server.
Here are your other choices.
R5RecordTypeLive – Stream but do not record
R5RecordTypeRecord – Stream and record the file name. Replace existing save.
R5RecordTypeAppend – Stream and append the recording to any existing save.
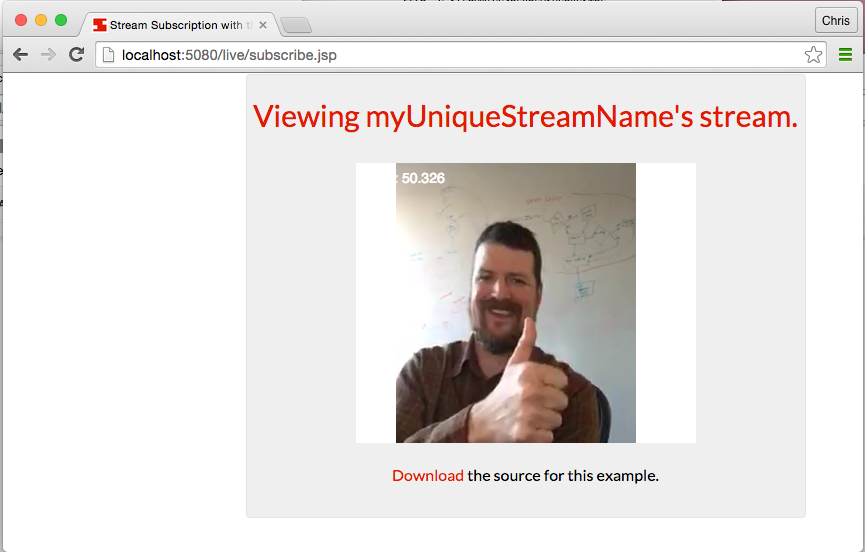
If you compiled and ran this app with it configured to point to a running Red5 Pro server, you would be able to see it running in your browser. Open a browser window and navigate to** –>** http://your_red5_pro_server_ip:5080//live/streams.jsp to see a list of active streams. Click on the flash version to subscribe to your stream.
The Subscriber
Now that we’ve built the publisher we have established a live stream being published to the server. Yes, we did see the stream in Flash, but in order to consume that stream on mobile we need to build the subscriber client. Let’s dig into that now.
R5Configuration:
Just as before, we setup a configuration object holding the details of our connection and protocols.
iOS
//Setup a configuration object for our connectionR5Configuration *config = [[R5Configuration alloc] init];config.host = [@"192.168.0.1"];config.contextName = [@"live"];config.port = 8554;config.protocol = 1;config.buffer_time = 0.5;Android
R5Configuration config = new R5Configuration("rtsp", "192.168.0.1", 8554, "live", 0.5f);R5Stream:
Then, like in the publisher, we set up a stream by passing in the configuration into the constructor.
iOS
//Create our new stream that will utilize that connectionself.subscriberStream = [[R5Stream alloc] initWithConnection:connection];//Setup our listener to handle events from this streamself.subscriberStream.delegate = self;Android
//setup a new stream using the connection subscriberStream = new R5Stream(connection);R5VideoView:
This is the step where things deviate just a little from the publisher. We still set up an R5View, but this time we want to use it to display the incoming stream
iOS
-(R5VideoViewController *) getNewViewController: (CGRect) frame{ UIView *view = [[UIView alloc] initWithFrame: frame]; R5VideoViewController *viewController = [[R5VideoViewController alloc] init]; viewController.view = view; return viewController;}[self addChildViewController:self.r5View];[self.view addSubview:self.r5View.view];//show the camera before we start![self.r5View showPreview:YES];//show the debug information for the stream[self.r5View showDebugInfo:YES];//attach the incoming stream to the view[self.r5View attachStream:self.subscriberStream];Android
R5VideoView r5VideoView =(R5VideoView) view.findViewById(R.id.video);r5VideoView.attachStream(subscriberStream);subscriberStream.setView(r5VideoView);cam.startPreview();R5Stream.play():

Finally, we tell the stream to play by using the play method and passing in the unique stream name that the publisher is using.
iOS
//start subscribing!![self.subscribe play:[@"myUniqueStreamName"] ];Android
subscribe.play("myUniqueStreamName");Voila, you can now build your own one-to-many live streaming experience, all within minutes with the help of Red5 Pro. What do you think, are there ways we could make this even easier? We love hearing feedback, so let us know in the comments or email us directly. Happy Coding!