A lot of developers have been asking us detailed questions about recording streams using Red5 Pro. The one thing that comes up most frequently is how to create an MP4 file for easy playback on mobile devices. While you can use our SDK to playback the recorded file as is (Red5 records in FLV format),… Continue reading How-To: Converting Recorded Files to MP4 for Seamless Playback via Red5 Pro
A lot of developers have been asking us detailed questions about recording streams using Red5 Pro. The one thing that comes up most frequently is how to create an MP4 file for easy playback on mobile devices. While you can use our SDK to playback the recorded file as is (Red5 records in FLV format), this requires that the user always use your native app, and sometimes it would just be nice to provide a link to an MP4 for progressive download.
So with that, here’s a quick guide to get you up and running with a custom Red5 application that converts recorded files to MP4 for easy playback. Conversion to MP4
Install ffmpeg
The first step is to install ffmpeg on your server. ffmpeg is a great command line utility to manipulate video files, such as converting between formats like we want to do for this example.
You can find precompiled packages for your platform from ffmpeg’s website, although if you need to convert your recordings to formats that need an extra module on top of ffmpeg, you might need to compile those from scratch. Once you have ffmpeg on your server, just issue a simple command to make sure it’s working. The simplest thing you could do is just called ffmpeg with no params like this: ./ffmpeg . That should output something like this:
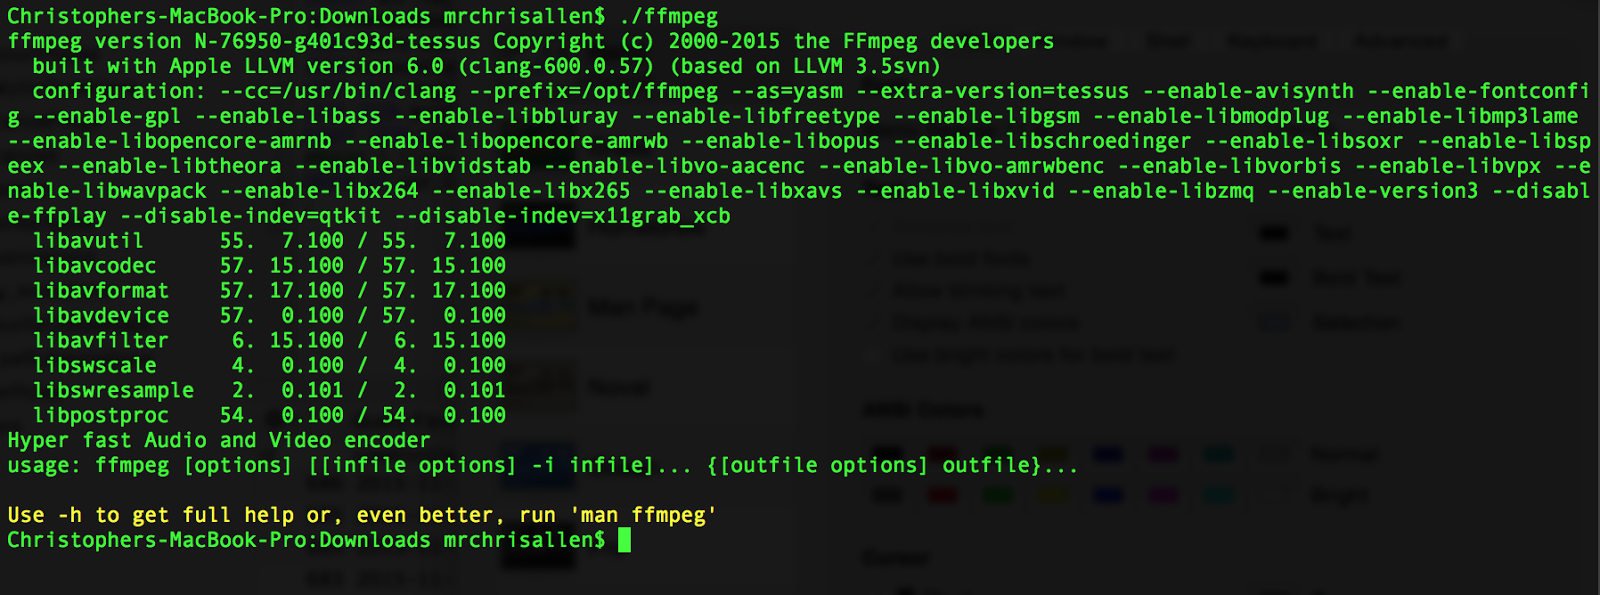
If you see it output the version number and other info, it means you have a working version installed on your machine. Note that I’m running on my local Mac, but the same concept applies to putting it on any other OS. Also note, for production use, you would want to put the binary in a better place than ~/Downloads , and you would want to update your PATH to point to the ffmpeg application from anywhere.
Start Your Own Red5 Application
Now that you have ffmpeg on your server, the next step is to build your own custom server side application for Red5, extending the live example here. You will use this as the beginning of your custom app that will convert your recorded files to MP4.
Overwrite MultithreadedApplicationAdapter.streamBroadcastClose()
Now on to calling ffmpeg from your custom Red5 Application.
In your MultiThreadedApplicationAdapter class you will now need to override the streamBroadcastClose() method. As is pretty obvious from the name, this method is called automatically by Red5 Pro once a stream broadcast has finished and closed. Even though the Broadcast is finished, it doesn’t mean that the file has finished being written. So, in order to handle that, we need to create a thread to wait and allow the file writer to finish the flv write-out. Then, we access the file and convert it to an MP4 using ffmpeg.
Let’s see what that looks like in code:
1. Overwrite the method.
public void streamBroadcastClose(IBroadcastStream stream) {2. Check to make sure there is a file that was recorded.
if (stream.getSaveFilename()!=null) {3. Setup some variables to hold the data about the recorded file.
final String name = stream.getPublishedName();final String theFlv = stream.getSaveFilename();final IScope fileScope = stream.getScope();4. Create a thread to wait for the FLV file to be written. Five seconds should be plenty of time.
new Thread(new Runnable(){ @Override public void run() { //let the server finish writing the file. try { Thread.sleep(5000); } catch (InterruptedException e) { e.printStackTrace(); }5. Next we need to get a reference to the FLV file.
Resource res = fileScope.getResource(theFlv);6. Make sure that there is a file before continuing.
if (res != null){7. Get the path to the file on the file system and the path to where you want the MP4 version saved.
try { // Get the context that is processing this information String where = fileScope.getContextPath(); // If the context begins with a "/", remove it if (where.indexOf("/") == 0) { where = where.substring(1); } // Split the context on a separator, in this case "/" String[] paths = where.split("/"); // Our base context is the first item in the paths list String appName = paths[0]; String inputLocation = "PATH_TO_RED5_ROOT/webapps/" + appName + "/streams/"; // Add any additional context paths to our inputLocation for (int i = 1; i < paths.length; i++) { inputLocation = inputLocation + paths[i] + "/"; } String filePath = inputLocation+name+".flv"; String outputLocation = "PATH_TO_RED5_ROOT/webapps/" + appName + "/"; String outputFile = outputLocation + name +".mp4";8. Delete any previous file created, otherwise FFMPEG will fail to write the file.
File checker = new File(outputFile);if(checker.exists()) { checker.delete();}9. Tell your application where to find FFMPEG . Note in this case we’ve added the app to our PATH so we can call it from anywhere.
String ToolPath="ffmpeg";10. Create the FFMPEG command.
String[] commandFixed = { ToolPath, "-i", filePath, //additional arguments outputFile};11. Run the process.
Process p = Runtime.getRuntime().exec(commandFixed);12. Read the output from FFMPEG for errors and other info.
SyncPipe errors = new SyncPipe(p.getErrorStream());SyncPipe infos = new SyncPipe(p.getInputStream());13. Create threads for each of these and wait for the process to finish.
new Thread(errors).start();new Thread(infos).start();//let this thread wait for the process to exit.int returnCode = p.waitFor();14. Make sure that the process created the file and that it didn’t log any errors.
checker = new File(outputFile);if(!checker.exists() || checker.length() == 0) { log.error("Error processing" + returnCode);}15. Finally catch any potential exceptions and close out the thread you created.
} catch (IOException e) { //handle the IO exception e.printStackTrace(); } catch (InterruptedException e) { //handle the Interrupted exception e.printStackTrace(); } }}}).start();That’s it! You’ve now created an MP4 file from the recording. Rather than typing that out line by line we’ve provided the example project here:
Red5 Pro MP4 File Conversion on GitHub
Now that you know how to intercept one of the methods of the MultiThreadedApplicationAdapter in Red5 Pro you can start to look at other ones you could implement to do custom behavior for your app. Many people who are recording their files want to move them to an Amazon S3 bucket for storage. Adding in a few lines using Amazon’s API to do that wouldn’t be too challenging.
What other things would you want to do with a custom Red5 application? We would love to hear from you.
-Chris